Dropping in Hockfugen

EQUIPMENT CHECK

Lightest Avalanche Shovels and Probes  + Techniques

As more of us bring along heavy avalanche airbag systems or start to head out for longer splitboard missions then it's worth considering the weight of your kit.

I know after a quick evaluation of my primary off piste equipment I was able to save a considerable amount. In this guide I'll look to save you some weight and help you understand what to look for in your choices and some hints on how to use it more effectively.
Snow Shovels 

When choosing a snow shovel you'll want to consider your requirements and budget. Having an extendible shovel will give you more leverage and distance from the snow making it easier to dig. However, you may want a smaller non-extendible shovel for ease of packing or weight.

How does the handle shape and length affect its attachment to the exterior of a pack to stop it falling off, or fit within a pack? How does the shape of the blade make it fit within your pack? If it's very curved that could affect your ability to fit other items in your pack. Plus, the bigger the blade the more snow you can move. You might need to move 1500 litres of snow for an average rescue. It's all not so obvious stuff, but well worth considering before you buy.  

After all that you can look at how much you're willing to spend to make it work best for your needs. Just don't look to compromise too much on the quality or weight. At the end of the day this is a crucial piece of safety equipment. You don't want to be trying to dig out a buddy with some plastic shit you bought off ebay. 


  1. Jones Excavator - 377g - Fixed size 49cm carbon shaft with anodised aluminium blade. T-shaped handle. All black and mean looking.
  2. Arva Plume - 380g - Single size 47cm Carbon shaft. Aluminium blade. Possible packing issues with length of shaft.
  3. Ortovox Pro Light - 440g - My current choice of shovel. Telescoping handle. Anodized aluminium blade and telescopic shaft. Rectangle shaped shaft for fast attachment. Shaped to assist in creating a rescue sled or snow anchor. UIAA certified.
  4. Mammut Alugator Light - 475g - Telescopic shaft (smallest size 37cm). Aluminium constriction. Shaped to assist in creating a rescue sled or snow anchor. UIAA Certified.
  5. Pieps T500 - 500g - One size fixed shaft (45cm) with rescue sledge function.
  6. Voile XML - 500g - One size fixed shaft (37cm). Tempered Aluminium.
  7. Black Diamond Deploy - 565g - Integrated curved shaft within the shovel blade to speed setup. Collapsed 43cm length.
  8. BCA B1 EXT - 600g - BCA's most popular shovel. Light and strong aluminium construction. This was my usual shovel before upgrading to the Ortovox Pro Light.
  9. Ortovox Badger - 625g - No fuss, bulletproof simple aluminium design.   
  10. Pieps C660- 660g- Hoe and rescue function. Unusual C shaped handle and bottle opener.

Shovel quickly and effectively to save lives

When digging out avalanche victims after an avalanche, the following procedure should be followed:

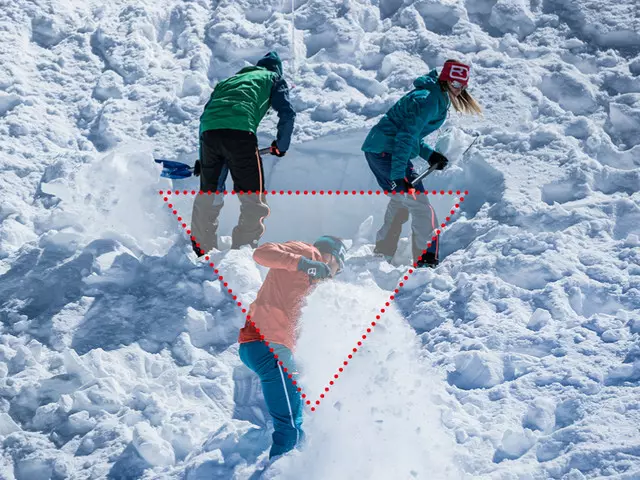
1- Read of the victim‘s depth from the probe and walk down the slope by this figure and start shoveling in a V-shape.
2 - If there are several helpers, two people stand at the front and shovel the snow backwards. The third stands behind and clears the snow away. change positions after one minute.
3 - The positions should be taken as follows:cut out blocks, shovel, and clear snow away.

Tip: Shovels with a clearing function can save valuable time here. The average burial depth from which people are rescued alive is 50cm (statistics: Tschirky 2000). This requires the excavation of 1500 liters of snow! Saving time digging means increasing the chances of survival.
Source - Ortovox

Avalanche Probes

I consider a minimum length of 2.4m as a good safe size for the effective location of most victims. Typically a probe is given the least amount of consideration, but it can make a significant difference in rescue time. I've seen guys fiddle with a probe in excess of two minutes trying to get it constructed. Whatever probe you decide on you'll need to become very familiar with setting it up and taking it down in a short time. Say 10 seconds from getting it out of your pack. Probes have been damaged on packing up as well, so don't forget to have that on point.

You'll have the choice of carbon, aluminium, and steel. Carbon has a high strength to weight ratio, but will cost you more. Steel is super strong but heavy. Some of the most popular and lightest probes from some key manufacturers are listed below, with some key data and comments. Prices do vary, so it's worth doing your own research for the best deal. 

  1. Mammut Light - 2.4m - 179g - Packed Length 38cm - Carbon - Quick to extend and light, but have experienced minor issues with the small locking button freezing when securing the probe sections in place.
  2. Ortovox Carbon Superlight - 2.4m - 185g - Carbon - Pull cord with adjustment screw. It will require a tailored setup prior to use. Clients have struggled with this setup in tests.
  3. BCA Stealth - 2.4m - 215g - Packed Length 40cm - Carbon - Pull button auto-lock system. Proven very effective when testing in the field.
  4. Jones Strike Probe - 2.4m - 226g - Packed Length 40cm - Aluminium - Rack locking system with Kevlar cord.
  5. Black Diamond Quickdraw - 2.4m - 227g - Carbon - Similar locking mechanism to the Jones Strike. 
  6. Arva Spark - 2.4m - 250g - Packed Length 30cm - Aluminium - Pin locking system with pull handle. That could have problems if the small pin freezes.
  7. Decathlon Wedze - 2.4m - 260g - Packed Length 45cm - Aluminium - Very cheap with locking mechanism. Solid option for those on a budget. 
  8. Voile Tourlight - 2.6m - 266g -  Packed Length 37cm - Aluminium - Similar pin locking system to Arva Spark that could have problems if the small pin freezes.
  9. Ortovox 280 + PFA - 2.8m - 355g - Carbon - Commonly used by rescue organisations and mountain guides. Thicker than many probes with pull cord tensioner and auto-lock.
  10. Arva Guide - 2.6m - 360g - Packed Length 37.5cm - Aluminium - Commonly used by rescue organisations and mountain guides.

Probing correctly to speed up recovery

After completing the fine search with an avalanche transceiver and marking the location, you need to pinpoint the victim with the avalanche probe.

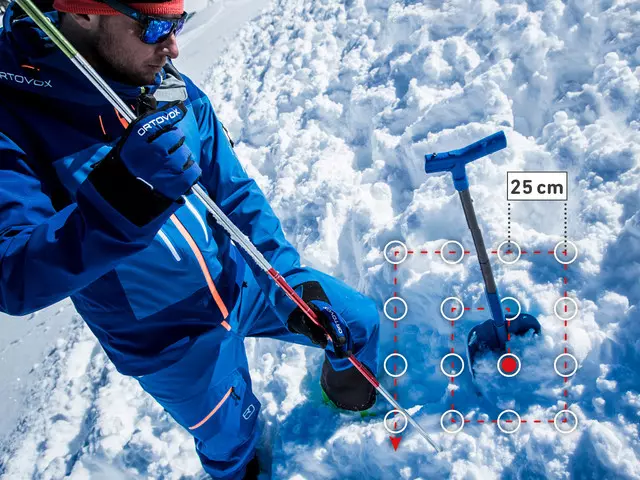
1 - Mark the point with the smallest transceiver distance measurement (with crossed ski poles, shovel etc.).
2 - Starting from this point, probe the area systematically from the inside to the outside in the 25cm (~10 in) grid spacing shown.
3 - The probe remains in place and is used for orientation purposes.
Tip: Always probe at a 90° angle to the surface of the snow. Source - Ortovox.

Follow us

FOLLOW THE FUN & PROGRESSION

Join the community

SIGN UP TO BE INFORMED & INSPIRED

© Copyright 2008-2024 Maverix Snow Ltd - All Rights Reserved - Privacy Policy - Terms & Conditions - Sitemap